Ok so maybe it's not just a phase.............
Saturday, November 9, 2013
My Bag Phase
I have only recently realized my obsession with bags. Tote bags. Small zipper bags. Big shopping bags. I have so many. Can you have too many? Here is a photo journal of just "some" of the bags I have made recently.
Saturday, November 2, 2013
Luggage Tag Tutorial
I have had so much fun making things from tutorials found on blogs of some of the most creative people. Check out some very user friendly ones at Dog Under My Desk. Erin has some great tips and a page all about interfacing that I linked below. She also has fantastic patterns.
Here is my first attempt at a tutorial.
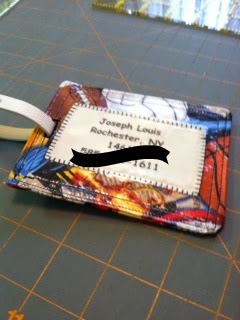
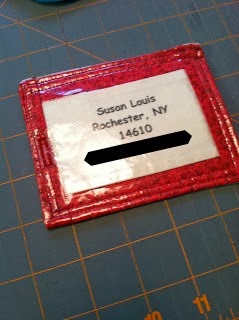
I used scraps of things I had and bought the little buckle straps at a local craft shop. They were meant to be bracelets but this is so much better. The personal info has been blocked out for instruction photos only.
Once the three sides are sewn, trim the two corners and carefully turn the tag right side out.
Here is my first attempt at a tutorial.
A very easy luggage tag.
I used scraps of things I had and bought the little buckle straps at a local craft shop. They were meant to be bracelets but this is so much better. The personal info has been blocked out for instruction photos only.
I bought some June Taylor computer printer fabric.
I actually printed out 6 on a page.
Once you cut them up you can't put it back in the printer so plan ahead.
Be sure to peel the paper off the back once you print.
I have 2 different methods shown below.
They both come out the same size about 3 1/2" x 4 1/2"
You will also need the following:
1- 4" x 5" piece of Peltex 70 Interfacing to stiffen the tag
1 - 4" x 5" piece of Slicker - Iron on vinyl to protect the printing
Scraps of theme fabric
Method 1 - 1 piece 4" x 5"
and 4 - 1 1/2 inch strips x 8"
Method 2 - 2 pieces 4" x 5"
And your printed computer fabric
I cut this piece 2 3/4" x 4"
Method 1:
Then trim the piece down to 4" x 5"
Method 2:
Cut the address piece a bit smaller, place on top of a your theme fabric piece 4" x 5". Blanket stitch around the edges.
From here on the directions are the same.
Next take the piece of Slicker and following the instructions stick the sticky side down over the front address piece. ALWAYS use the paper you peeled off between the iron and the vinyl.
Next with right sides together sew the slicker front to the theme back piece on 3 sides leaving one end open like an envelope.
NOTE: Pins will leave a mark in the slicker.
I used my binding clips since the Slicker makes it very slippery.
Have you seen these??
A friend at work brought them in. They were used to "pin" her husbands new dress shirt. They are like paper clips and won't leave a mark either.Once the three sides are sewn, trim the two corners and carefully turn the tag right side out.
Cut down the Peltex so it slides easily inside the envelope you have just made.
Turn under the open end and carefully press using your paper.
Topstitch very close to the edge and again 1/4" away on all 4 edges.
A quick button hole at one end and your tag is complete !!
I used this great find at my local craft store but a ribbon or hair elastic would work just as well.
My sister and family are going to Disney this month.
The theme prints make it so much fun !!
Saturday, October 26, 2013
Meet Annabelle
Meet My Annabelle
This is her "before" photo. She has been in a box for years. I looked up her serial number on a featherweight website and she was made in 1934. That makes next year her 80th Birthday!! I know my mom Anne Dunn Meredith used this machine but it could also have been used by her mom Clara Brechter Giesselman or her sister Margaret Giesselman.
I borrowed a book/manual from Dr Deb Fox on how to clean and maintain your featherweight.
With the very detailed instructions in this book I felt like I was ready to get this machine up and running.
I bought a few tools to help me.
And set about taking her apart and cleaning out the dust bunnies.
I used the little singer bottles of machine oil and put everything back together. The feet on the bottom were falling apart. They were like the gum you find stuck under the table at school. I pried them off and found some on Ebay for $5-$6. I cleaned all the old masking tape off the sewing surface that had been used to mark seam allowances I wound the bobbin and threaded the machine.
She shines !!!
She sews !!!
I am in love !!!
Annabelle (as I have named her) only sews forward and backwards. She is perfect for piecing. Today her and I worked on a bright and colorful quilt.
LIFE IS GOOD !!
Friday, October 11, 2013
Thursday Night Quilt Class
On the second Thursday of every month I have been going to a quilt class held at Ivy Thimble Quilt Shop in Victor NY. Last year we made these gorgeous monthly squares that could be used on a wire display or hung on a door. This year we are doing table runners that go along with the season or holidays. We have a fantastic group of quilters that try to come every month. Joanne is our instructor and she knows hundreds of tricks and tips! Trish is the store owner and is always there to support us, show us the latest books, tools and classes.
So this month the class was to make a beautiful table runner with a fall theme.
So this month the class was to make a beautiful table runner with a fall theme.
We were doing the one on the bottom right corner.
But only Laura was doing the class.
The rest of us were misbehaving!
Nancy was doing a fall table runner with graduating shades of the most rich looking fall colors you have seen.
Kim was working on her Civil War quilt. Or so she said. Every time I looked over she was looking at the instruction book with her head in her hands!!
Shannon and Nicole were starting a table topper project they found on a recent road trip.
My boss and friend Deb couldn't come this month but was planning on working on her table runner at home during the same time. She texted me that didn't happen as planned.
And I was looking for advice on an idea I had to make personalized luggage tags for my sister Betsy and her family who are going to Disney in November.
Joanne introduced me to a product I had never heard of before called Slicker. It's iron on vinyl. Except you can't actually touch the iron to the vinyl or it will melt. But using the method in the instructions you can turn any fabric into waterproof fabric. NEAT STUFF !! I had found these fantastic little leather like bracelets at Joann Fabrics for $1.00 the other night and it was just what I needed to make my tags sturdy and functional. I also bought fabric sheets you can feed through an inkjet printer. Something else I had never done before.
So here is my finished project and I couldn't be more thrilled with it's outcome! I am going to make 5 more for the other travelers and maybe some with dice, playing cards or poker chips for my friends that go to Vegas yearly.
It is sooooo much cuter in person :)
 |
| Details hidden (HIPAA lol) :) |
Wednesday, October 9, 2013
New Project Time
I love Fall. Love the colors and the smells. I love the temperatures!! It's time for a new project. A while back I bought a few kits from Connecting Threads and tucked them away. This one is calling my name. I am not going to show you the design so you will have to wait to see the finished product. It's labeled as a table topper but could also double as a wall hanging. Finished size will be 32" x 32". As you know, I don't need a purpose to sew. No clue where it will end up but so far I am loving making it. Check it out.
Here are the fabrics
The first instruction is to "Fussy" cut the design
This means you have to center the design. Not as easy as you might think.
Next sew on lots of triangles
Love the way this is turning out but it's small to work with. The center square is 2 1/2"
More triangles sewn together and cut and sewn back together to make more 2 1/2" squares
The directions are very precise. Thankfully.
They are USA made so easy to understand!
Next I have to trim these raw squares down to the neat 2 1/2 in square but making sure the center stays in the center....Tricky
Before
After
Looking forward to more sewing this weekend. I will keep the photos coming ......
Subscribe to:
Comments (Atom)


.jpg)


.jpg)


.jpg)
.jpg)


